将 GNU 分析 (gprof) 与 ARM Cortex-M 结合使用
💡一则或许对你有用的小广告
欢迎加入小哈的星球 ,你将获得:专属的项目实战(已更新的所有项目都能学习) / 1v1 提问 / Java 学习路线 / 学习打卡 / 每月赠书 / 社群讨论
- 新开坑项目:《Spring AI 项目实战》 正在持续爆肝中,基于 Spring AI + Spring Boot 3.x + JDK 21..., 点击查看 ;
- 《从零手撸:仿小红书(微服务架构)》 已完结,基于
Spring Cloud Alibaba + Spring Boot 3.x + JDK 17...,点击查看项目介绍 ;演示链接: http://116.62.199.48:7070 ;- 《从零手撸:前后端分离博客项目(全栈开发)》 2 期已完结,演示链接: http://116.62.199.48/ ;
截止目前, 星球 内专栏累计输出 100w+ 字,讲解图 4013+ 张,还在持续爆肝中.. 后续还会上新更多项目,目标是将 Java 领域典型的项目都整一波,如秒杀系统, 在线商城, IM 即时通讯,权限管理,Spring Cloud Alibaba 微服务等等,已有 3700+ 小伙伴加入学习 ,欢迎点击围观
我在之前的一篇文章中发布了 GNU gprof 分析如何寻找嵌入式目标 ARM Cortex-M 的 先睹为快 :
飞思卡尔 Kinetis 微控制器应用分析
本教程介绍如何使用 GNU gprof 在 ARM Cortex-M 设备上分析嵌入式应用程序(不需要 RTOS)。此外,我还解释了生成 gprof 所需数据的内部工作原理。
大纲
在我之前的帖子(“ 使用 gcov、launchpad 工具和 Eclipse Kinetis Design Studio V3.0.0 的代码覆盖率 ”)中,我展示了如何使用 GNU 工具为裸机应用程序创建 覆盖率 信息。这篇文章是关于 使用 gprof 进行应用程序分析 的。由于这是一篇较长的文章,包含很多细节,所以我花了一些时间才把它写下来。但希望这篇文章能让您在 ARM Cortex-M 上使用强大的 GNU gprof 分析和嵌入式目标。我展示了如何在命令行模式下使用它或在 Eclipse 中使用 gprof(例如,在 Freescale Kinetis Design Studio 中,或任何其他带有用于 ARM Embedded 的标准 GNU 工具的 Eclipse 发行版)。
什么是剖析?它即将知道应用程序将大部分时间花在哪里,以便我可以对其进行优化。在 GNU 世界中,'
gprof
' 用于此目的,它是标准 GNU 二进制文件的一部分。 gprof 它通常用于主机或(嵌入式)Linux 应用程序。使用
gprof
进行分析需要 gcc 编译的源代码带有一个特殊选项来检测代码。然后在主机上使用
gprof
工具来分析和可视化数据。令我惊讶的是,我没有找到如何将
gprof
用于嵌入式裸机目标的说明或步骤。这篇文章试图弥合这一差距。
当然,我也可以为此使用任何 RTOS,例如 FreeRTOS。我在这篇文章中使用裸机来保持它的通用性。
为此,我正在使用:
- 工具链 :我使用的是 GNU ARM Embedded (launchpad) 4.9q2-2015。但也可以使用任何其他或更早的 ARM GNU 工具链。
- ARM Cortex-M: 我使用的是 Freescale 的 ARM Cortex-M4F( FRDM-K64F 板上 的 Kinetis K64F)。但也可以使用任何其他 ARM Cortex-M。
- 运行控制 :您需要一个运行控制设备能够执行包括文件 I/O 在内的完整半主机。我正在使用嵌入在 Freescale FRDM-K64F 板上的 Segger J-Link 。但也可以使用任何外部 Segger J-Link 探针。
- SDK :我需要为统计PC采样(直方图)设置一个计时器(SysTick)。每个芯片供应商都提供自己的库,我在本文中使用的是 Freescale Kinetis SDK 。但任何其他 SDK 或库都可以。
- IDE: 我使用的是基于 Eclipse 的 Freescale Kinetis Design Studio V3.0.0 。但是任何其他 Eclipse IDE 或 IDE 都可以。或者使用 vi ,那也可以 :-) 。或者使用命令行实用程序(不需要 IDE)。
本文中使用的项目发布在本文末尾的 GitHub 链接中。您可以从链接下载源代码和项目文件。
使用 GNU gprof 进行分析
要使用
gprof
,需要使用特殊的 (-pg) 编译器选项编译源代码。这会指示 gcc 编译器向生成的代码添加特殊调用(稍后会详细介绍)。我可以检测我的所有应用程序代码或仅检测其中的一部分。如果我想限制在已检测 (.elf) 映像中创建的开销(FLASH、RAM)(稍后也会详细介绍),仅检测其中的一部分是有意义的。检测图像将收集分析信息,然后将其写入
gmon.out
文件。
gprof 系统概述
通常,生成的 .elf 文件被下载到嵌入式目标/板上,例如使用调试器。在应用程序退出时,分析数据被写入文件 gmon.out。通常,裸嵌入式目标没有文件系统。因此我需要一种方法将数据从开发板传输到主机。一种方法是使用“半主机”:通过半主机,应用程序使用特殊的 I/O 库。
半主机意味着嵌入式应用程序与一个特殊版本的库链接,它将触发调试器进行任何控制台或文件 I/O 操作。应用程序可以使用 f_open() 之类的东西在主机上打开然后读/写文件 :-) 。
使用半主机,调试器将拦截 I/O 操作:它将通过调试接口将数据重新路由到主机:嵌入式应用程序可以读/写实际上位于主机上的文件。
半主机
我正在使用半主机将 gmon.out 数据文件从嵌入式板获取到主机 PC。一旦文件位于主机上,
gprof
程序就可以对其进行分析以生成报告。为此,
gprof
使用 .elf 文件中的调试信息来定位函数和源文件。
gprof:呼叫计数和 PC 采样
这就是
gprof
工作原理:它有两个方面:
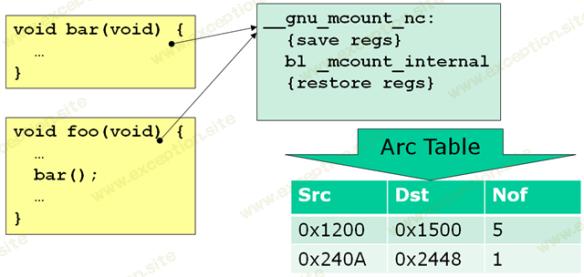
- 函数调用计数 :它对每个检测函数进行计数,调用函数的次数以及从何处调用。 gcc 在每个检测函数的开头插入对特殊库函数的调用以计算调用次数。这会创建“弧”:有关谁在调用什么、调用了多少次的信息。考虑图中的有向边。计数是用 _mcount() 完成的,或者在 GNU for ARM 的情况下是用 __gnu_mcount_nc() 完成的。
- 程序计数器采样 :在一段时间内,当前 PC(程序计数器)被采样,创建 PC over 地址的直方图。这通常是通过 profile() 函数完成的。
函数调用计数是通过在每个检测函数的开头插入一个特殊调用来完成的。 GNU ARM Embedded 调用函数
__gnu_mcount_nc()
:
调用_mcount
_mcount_internal()
函数计算每次调用的源地址和目标地址,并将其存储在一个表中。该表有一个计数器,指示从源地址执行了多少次调用。这样的表行条目称为“弧”。
对于函数调用计数,编译器在每个检测函数中插入对 __gnu_mcount_nc 的调用。下面是一个要检测的示例函数:
 static void CheckButton(void) {
 uint32_t val;
val = GPIO_DRV_ReadPinInput(BUTTON_SW2);
if (val==0) { /* SW2 pressed! */
...
使用 -pg 选项编译后,反汇编代码显示插入了对 __gnu_mcount_nc() 的调用:
 static void CheckButton(void) {
 uint32_t val;
val = GPIO_DRV_ReadPinInput(BUTTON_SW2);
if (val==0) { /* SW2 pressed! */
...
第二件事是 程序计数器采样 。 gprof *不* 测量函数从开始到结束所花费的时间:
测量函数执行时间
这种测量可以用“穷人的侧写”方法来完成。
相反,它对程序计数器 (PC) 进行定期采样,比如每 10 毫秒一次,并在直方图中计算该 PC 的数量:
PC采样创建直方图
直方图基本上是一个代码空间地址数组,其中包含 PC 被采样的次数。
请注意,采样仅与程序计数器地址有关。 gprof 稍后将使用调试信息将地址范围与函数匹配。
准确性和时机
基于弧和 PC 采样信息,
gprof
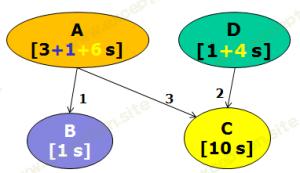
能够估计函数花费的时间。考虑以下示例,其中
A()
调用
B()
和
C()
,而
D()
调用
C()
。
A()
已被采样 3 次 ([3 s]),
D()
已被采样一次 ([1 s]):
带有时间信息的弧线
箭头上的数字表示执行的调用次数:
A()
调用
B()
一次,调用
C()
三次。
gprof
将开始自下而上分布运行时间:
B()
已用一个样本进行采样(例如,一个样本持续时间为 10 毫秒)。
C()
已被采样 10 次。由于
C()
总共被调用了 5 次,因此 5 的采样时间根据调用次数分配给
C()
的调用者。所以
A()
被添加 ((10/5)*3 ==> 6) 并且
D()
被添加额外的 4 个样本 ((10/5)*2)。
gprof
假定在
C()
中花费的时间与调用方式无关。也许 A() 正在使用参数调用 C() 让 C() 花费更多的 CPU 周期。
gprof
确实假设调用 function() 总是需要同样的努力。这可能并不总是正确的。
PC 抽样有时称为“统计抽样”,并非没有错误。 PC 采样的第一个错误与采样频率有关:通常以 10 毫秒或 1 毫秒的速率进行采样。这意味着小于采样时间的短函数将很少被采样或根本不被采样。如果一个函数没有被多次采样,它的计时就不会很准确。
从数学上讲,采样的预期误差是采样数的平方根。用例子来说明这一点:
- 采样频率为 100 Hz(采样周期 10 ms)。如果 1 秒,10 个样本将运行一次。错误是 SQRT(100),即 10,即 10*10ms = 100ms。所以“测量”的 1 秒有 100 毫秒 (10%) 的误差。
- 采样频率再次为 100 Hz,函数被采样 10000 次(运行时间 100 秒)。错误是 SQRT(10000) 或 100 个样本或 1 秒。这意味着此函数的误差为 1%。
这意味着只有高样本数才是准确的(数百个样本)。如果一个函数的样本计数很小,这并不能说明什么。要获得更高的样本数,您需要延长分析时间或组合多次分析运行。
弧形和直方图的内存要求
到目前为止,我已经介绍了
gprof
收集的信息:
- Arcs :从哪里(地址)调用哪个地址(函数)以及调用多少次。
- 直方图 :周期性地对程序计数器进行采样,程序计数器在文本/代码范围内的频率分布。
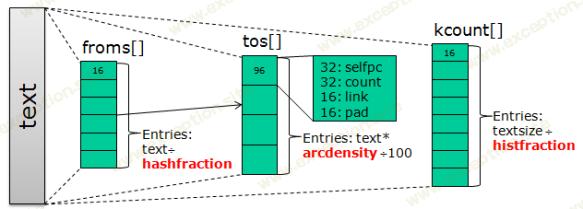
在我使用的实现中,信息被收集并存储在数据结构中,如下所示:
为 gprof 收集信息的数据结构
- text 是要监视的内存范围。通常这是应用程序的闪存或代码范围。仅支持一个内存区域。
- 数组 froms[] 和 tos[] 正在构建 Arcs。 froms[] 是一个数组,映射执行函数调用的文本地址。
- froms[] 是 tos[] 数组中的短(16 位)索引值数组。这意味着最多可以有 65535 个 Arcs。
- 为了节省 froms[] 数组的内存,映射不是 1 到 1:而是使用 hashfraction 来减少条目数。这个 hashfraction 是可配置的,对于 ARM 上的拇指代码可以是 2 或更高,因为只能从偶数地址进行调用。
- tos[] 是一个目标地址数组,每个条目共有 96 位:一个 32 位的 selfpc (调用的目标地址),一个 32 位的 计数器 ,该 selfpc 被调用了多少次,一个 16 位的 链接 索引到 tos[] 数组。为了将数组条目对齐到 32 位地址,有一个 16 位 填充 字段不用于任何数据。
- 要减小 tos[] 数组的大小,可以指定 密度 。这个值是一个百分比,一个地址范围需要多少个弧。或者换句话说:分析代码的函数调用密度。例如,arcdensity 为 2% 意味着我们可以使用调用覆盖最多 2% 的文本区域。
- kcount[] 是采样 PC 的直方图:每个计数器都是 16 位宽。为了减少所需的 RAM 量,可用的文本/代码区域除以 histfraction 。对于 thumb 模式的 ARM Cortex-M,由于每条指令至少 16 位长,因此可以使用 >= 2 的 histfraction 值。
因此,要覆盖的文本范围越大,需要的 RAM 就越多。举个例子:
- 文本==8192 字节
- hashfraction==2(覆盖每个“发件人”地址
- arcenensity==2%(2%的文字是函数调用)
- histfraction==2(每个地址都可以采样)
这将导致需要 10148 字节的 RAM:
所需 RAM 示例
显然,许多目标没有那么多可用的 RAM。然后策略是使用更高的分数值和/或更低的电弧密度。另一种方法是有选择地仅检测一部分源文件/模块,并使用链接器文件将它们放入文本范围内,因为可以组合多次 gprof 运行。但是存储数据所需的 RAM 量确实是使用 gprof 的问题 :-( 。
节目流程
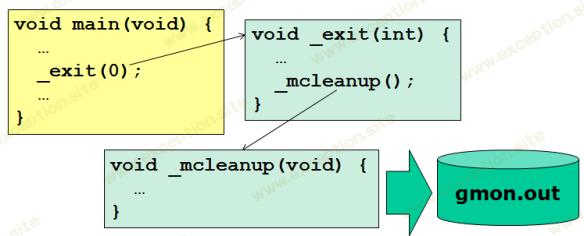
检测后,程序将像往常一样运行,除了函数调用被记录在弧形中并且 PC 被采样成直方图。通常在程序末尾调用 _exit() 来写入数据,然后程序调用 _mclean() 来写入文件:
编写 gmon.out 的程序流程
应用程序当然可以直接调用 _mcleanup(),然后它将使用文件 I/O 写入数据,这些数据通过半主机传输到主机。
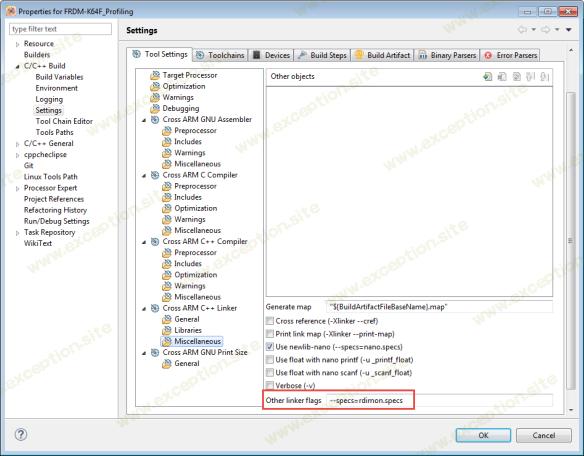
为了启用半主机(使用 newlib-nano),我在链接器设置中指定了这个选项:
 static void CheckButton(void) {
 uint32_t val;
val = GPIO_DRV_ReadPinInput(BUTTON_SW2);
if (val==0) { /* SW2 pressed! */
...
半主机的链接器选项
请注意,有几种不同级别的半主机实现。我正在使用 Segger J-Link 接口,它实现了控制台和文件半主机。
探查器库
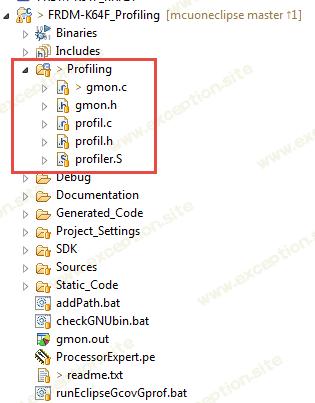
由于 gcc ARM Embedded(launchpad)工具不附带包含分析支持的库,我添加了将 cygwin for i386 端口移植到 GNU ARM。分析端口库在本文末尾的 GitHub 位置的项目中可用。
确保使用 GitHub 中的最新文件。我在这里发布当前版本用于文档目的。
分析库
使用选项 -pg ,gcc 编译器将添加对 __gnu_mound_nc() 的调用以计算函数和构建弧。 profiler.S 实现该功能:
 static void CheckButton(void) {
 uint32_t val;
val = GPIO_DRV_ReadPinInput(BUTTON_SW2);
if (val==0) { /* SW2 pressed! */
...
gmon.h 实现 gmon.c 的接口。它声明数据结构并包含配置参数。调用 _mcleanup() 将写入输出文件。 _monInit() 必须从启动代码中调用,以防启动代码也被检测到。
 static void CheckButton(void) {
 uint32_t val;
val = GPIO_DRV_ReadPinInput(BUTTON_SW2);
if (val==0) { /* SW2 pressed! */
...
gmon.c 用_mcount_internal()实现计数功能,用_mcleanup()实现数据写入。该实现使用全局标志 already_setup:第一次创建弧时,它将使用 malloc() 分配内存。
 static void CheckButton(void) {
 uint32_t val;
val = GPIO_DRV_ReadPinInput(BUTTON_SW2);
if (val==0) { /* SW2 pressed! */
...
在 profile.h 中是 PC 采样直方图功能的接口:
 static void CheckButton(void) {
 uint32_t val;
val = GPIO_DRV_ReadPinInput(BUTTON_SW2);
if (val==0) { /* SW2 pressed! */
...
The PC sampling is implemented in profile.c . I'm using the SysTick with the Kinetis SDK to generate a 1 kHz sampling interrupt:
 static void CheckButton(void) {
 uint32_t val;
val = GPIO_DRV_ReadPinInput(BUTTON_SW2);
if (val==0) { /* SW2 pressed! */
...
With this, the profiling library and support is complete.
It is ok to profile the profiler library too, except do *not* profile gmon.c. I have not found a way to disable profiling for a single function.
Profiling and Calling _mcleanup()
With the library included in the application, I can run the application as usual. The profiling with arc counting and histogram generation might slow down the application maybe ~30%, depending on the number of function calls. The PC sampling (histogram) adds a constant load of about 5% or less, depending on the sampling frequency (is use typically a frequency of 1 kHz). With using an RTOS like FreeRTOS the PC sampling could be done from a task or better from the FreeRTOS tick hook.
At the end of the application (or when I'm done with profiling), I have to call _mcleanup() to write the profiling data. I most cases I'm using my own version of the _exit() function as below:
 static void CheckButton(void) {
 uint32_t val;
val = GPIO_DRV_ReadPinInput(BUTTON_SW2);
if (val==0) { /* SW2 pressed! */
...
In that above implementation I'm indicating the end with a visual LED code, because writing the output file with semihosting can take several seconds.
Compiler Settings
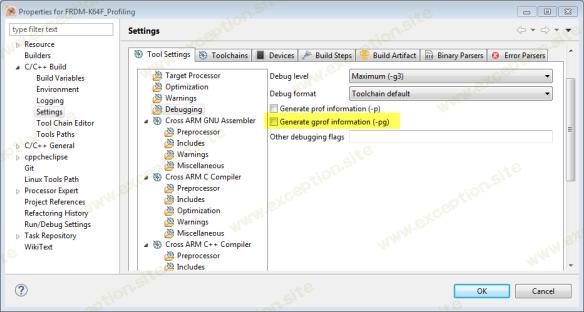
Now I have the library for profiling. What is missing are the required project settings. In the GNU ARM Eclipse panels, there is a 'Generate gprof information (-pg)' option:
-pg option
But it will not work that way! This option will be used for all the source files and will be passed to the linker. I do *not* set that option:
- It will instrument all the files which very likely will exceed the RAM size of an embedded target
- It will cause the linker to link with a special version of the C library, compiled with the -pg option too (libc_p.a)
Even if I would have enough RAM, the second point is a problem for the GCC ARM Embedded (launchpad) tools (at least up to version 4.9 2015q2): that GNU gcc distribution does not have that library included :-( (see this community discussion ): the linker will report:
 static void CheckButton(void) {
 uint32_t val;
val = GPIO_DRV_ReadPinInput(BUTTON_SW2);
if (val==0) { /* SW2 pressed! */
...
GNU linker error that it cannot find profiling library
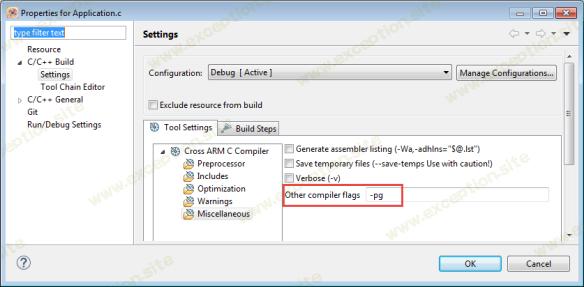
Instead, I specify the -pg compiler option on a per file/folder base: I only apply it to the files I want to profile (right click on the file/folder to set per-file/folder options):
Per file Option to Profile
Do *not* instrument (add the option -pg) to the profiling functions itself (file gmon.c), otherwise it will be called in a recursive way causing a stack overflow!
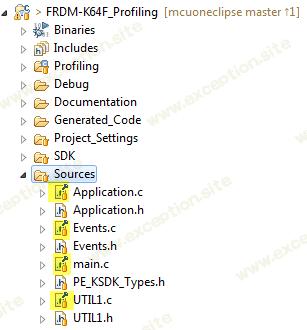
Eclipse will mark the files (see “ Icon and Label Decorators in Eclipse “):
Eclipse Icon Decorators to show Special Options per File
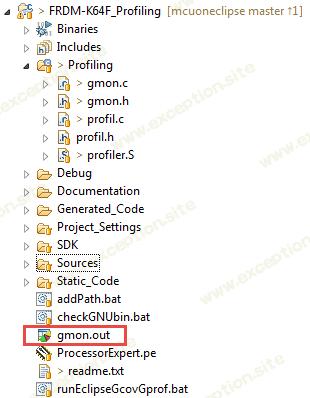
Running the program creates the gmon.out on the host through semihosting:
Generated gmon.out
Using Command Line version of prof
The gmon.out result file then gets analyzed with gprof command:
 static void CheckButton(void) {
 uint32_t val;
val = GPIO_DRV_ReadPinInput(BUTTON_SW2);
if (val==0) { /* SW2 pressed! */
...
See https://sourceware.org/binutils/docs/gprof/Invoking.html#Invoking for the command line summary.
To make it easier for me, I have the following addPath.bat DOS batch file which adds the GNU tools path:
 static void CheckButton(void) {
 uint32_t val;
val = GPIO_DRV_ReadPinInput(BUTTON_SW2);
if (val==0) { /* SW2 pressed! */
...
The gprof utility can be used like this:
 static void CheckButton(void) {
 uint32_t val;
val = GPIO_DRV_ReadPinInput(BUTTON_SW2);
if (val==0) { /* SW2 pressed! */
...
This creates the file gmon.txt with a 'flat' profile:
 static void CheckButton(void) {
 uint32_t val;
val = GPIO_DRV_ReadPinInput(BUTTON_SW2);
if (val==0) { /* SW2 pressed! */
...
Using gprof in Eclipse
The command line version of gprof is powerful. Another way is to use gprof in Eclipse. There is only a subtle problem: gprof and other GNU tools need to be present in the PATH, *without* the architecture (arm-none-eabi) prefix.
Both gcov (see “ Code Coverage with gcov, launchpad tools and Eclipse Kinetis Design Studio V3.0.0 “) and gprof need to have the tools in the PATH that way.
To keep toolchains and Eclipse IDE's separate, I'm reluctant to modify the Windows PATH globally as this affects *everything*. And using a non-matching gprof with a different GNU toolchain (mixing GNU versions) can have strange effects.
Instead, I have a special batch file which
- Configures the PATH locally in a CMD shell (addPath.bat)
- Ensures that the necessary GNU tools without arm-none-eabi name are present (checkGNUbin.bat)
- Launches Eclipse from the environment (runEclipseGcovGprof.bat)
addPath.bat has the following content:
 static void CheckButton(void) {
 uint32_t val;
val = GPIO_DRV_ReadPinInput(BUTTON_SW2);
if (val==0) { /* SW2 pressed! */
...
checkGNUbin.bat has the following content:
 static void CheckButton(void) {
 uint32_t val;
val = GPIO_DRV_ReadPinInput(BUTTON_SW2);
if (val==0) { /* SW2 pressed! */
...
And here is the content of runEclipseGcovGprof.bat :
 static void CheckButton(void) {
 uint32_t val;
val = GPIO_DRV_ReadPinInput(BUTTON_SW2);
if (val==0) { /* SW2 pressed! */
...
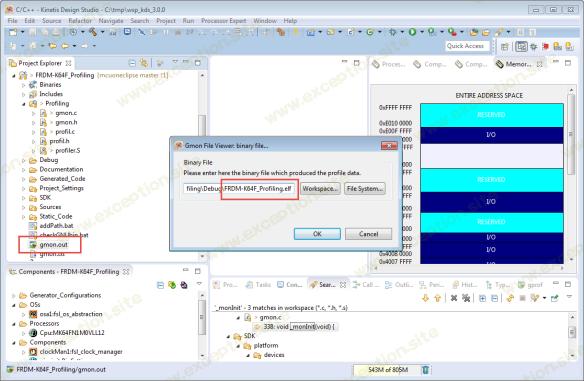
With an Eclipse launched like this, I can double click on the .out file in Eclipse and it will ask me for the .elf file to be used with that gmon.out file:
Launching gprof in Eclipse
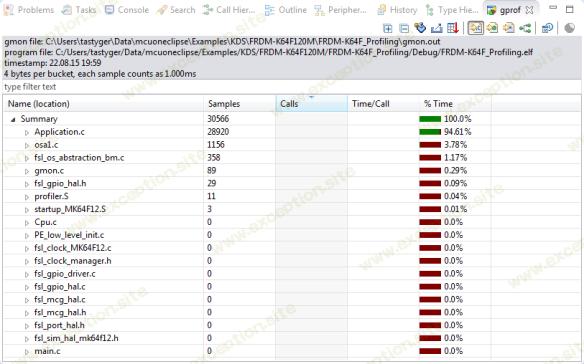
This then will open a nice graphical view (sorted by file):
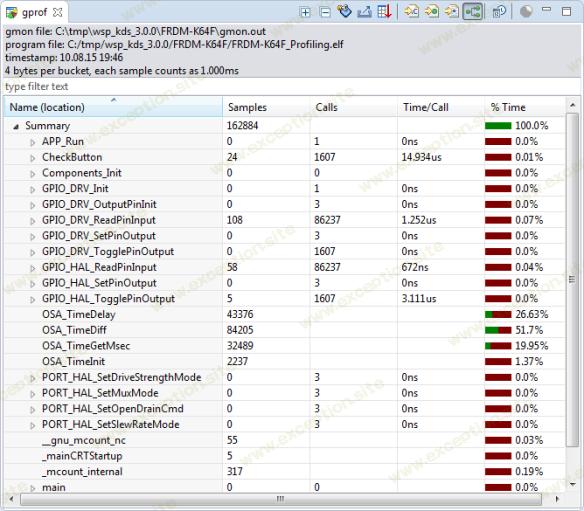
gprof View in Eclipse
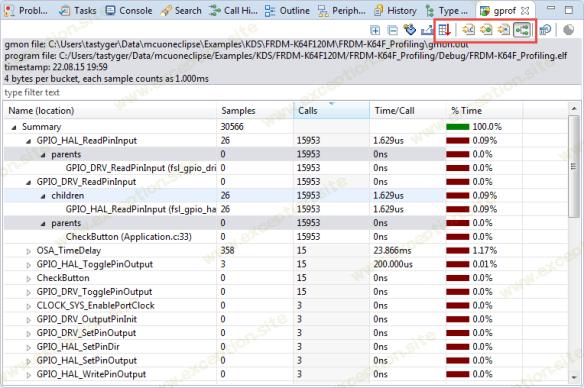
I have different ways of sorting, for example I can sort it by function calls:
gprof Function Call Graph
The columns show the collected information:
- Samples : How many times it has been sampled (PC histogram).
- Calls : how many calls to that function has been counted.
- Time/Call : average time per call.
- % Time : Percentage of time spent. The sum of all profiled functions are summed up to 100%.
As I can see from above example screenshot: I'm using a sample frequency of 1 kHz (“each sample counts as 1.000 ms” written in the header). GPIO_HAL_ReadPinInput() has been sampled 26 times, but has been called 15953 times. That function has been called from his parent function GPIO_DRV_readPinInput(), but because the parent is a very small/short function, it has been never sampled (Samples count zero).
So this shows that short functions might not be sampled. Basically I have a good chance to sample functions which take longer than the PC sampling period (in my case here 1 ms). So the sampling time is statistical and should be read with care. But the number of calls are counted in an exact way.
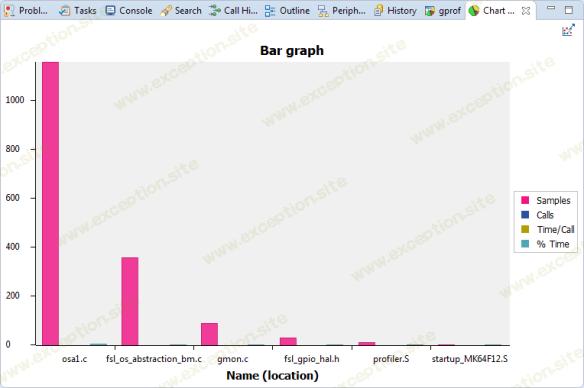
The gprof Eclipse view can visualize the data in multiple way, eg producing graphs and charts: select lines in the table view of gprof and use the 'Create chart…' button:
grpof chart
概括
Using gprof to profile an application gives useful information about where the application spends most of the time. It is important to understand how gprof works to correctly use the data generated. Using gprof requires a considerable amount of RAM which needs to be taken into account during the design. Understanding the way how gprof works helps to read the data and helps to find the 'hot spots' and to optimize the application. Gprof is more targeted to host or embedded Linux applications where lots of RAM is available. But as I can instrument parts of the application and with the help of semihosting, it is very applicable to embedded targets having at a few kByte of RAM available for this kind of thing. And gathering this kind of information is always better than not knowing anything ;-) .
The GCC ARM Embedded toolchain does not come with gprof enabled libraries. I have solved the problem with providing my own profiling implementation and libraries, inspired by the i386 cygwin libraries present in the GCC ARM Embedded libraries source files.
The project and source files discussed in this article can be found on GitHub: https://github.com/ErichStyger/mcuoneclipse/tree/master/Examples/KDS/FRDM-K64F120M/FRDM-K64F_Profiling
I'm going to present this research and approach at the Embedded Computing Conference 2015 .
Happy Profiling :-)
 异常教程
异常教程
