 异常教程
异常教程
在 OpenShift 上部署 Java EE 微服务
💡一则或许对你有用的小广告
欢迎加入小哈的星球 ,你将获得:专属的项目实战(已更新的所有项目都能学习) / 1v1 提问 / Java 学习路线 / 学习打卡 / 每月赠书 / 社群讨论
- 新开坑项目:《Spring AI 项目实战》 正在持续爆肝中,基于 Spring AI + Spring Boot 3.x + JDK 21..., 点击查看 ;
- 《从零手撸:仿小红书(微服务架构)》 已完结,基于
Spring Cloud Alibaba + Spring Boot 3.x + JDK 17...,点击查看项目介绍 ;演示链接: http://116.62.199.48:7070 ;- 《从零手撸:前后端分离博客项目(全栈开发)》 2 期已完结,演示链接: http://116.62.199.48/ ;
截止目前, 星球 内专栏累计输出 100w+ 字,讲解图 4013+ 张,还在持续爆肝中.. 后续还会上新更多项目,目标是将 Java 领域典型的项目都整一波,如秒杀系统, 在线商城, IM 即时通讯,权限管理,Spring Cloud Alibaba 微服务等等,已有 3700+ 小伙伴加入学习 ,欢迎点击围观
我昨天在博客上介绍了使用 WildFly Swarm 的简单 JAX-RS 微服务。您学习了如何使用 Maven 构建一个所谓的“fat-jar”,还使用 Maven Docker 插件对我们的微服务进行 docker 化并在 Docker Machine 上本地运行它。这是在本地测试事物的好方法。到目前为止缺少的是将其投入生产。让我们看看在 OpenShift Origin 上运行昨天的示例需要哪些步骤。
为什么企业 Java 开发人员应该关心?
但首先,让我们简要了解一下为什么企业 Java 开发人员应该关心所有这些。最近的炒作和嗡嗡声有些让我想知道。可以肯定的是,它们创造了一个有趣的运动场,您可以花费数小时下载容器镜像并在笔记本电脑上运行它们。但到目前为止,将它们投入生产是一个挑战。 Nigel 有一篇 关于 Docker 中不推荐使用的功能的非常好的博客文章 。它还有另一颗宝石:一段叫做:“企业影响”。主要报价是:
我敢肯定,在酷时髦的公司中一直都在做这种事情 [...] 但在生锈的老企业中绝对不会这样做 [...]。
-奈杰尔·波尔顿
我绝对可以支持。企业开发人员、架构师和项目经理在采用所有这些技术时采用的方法要慢得多且保守。他们正在寻找成功管理基础设施和项目的方法。所有这些技术都会进入我们的日常工作生活,但它们会以更易于管理的方式出现。所以,我们只是在做功课,让自己了解所有这一切,并评估有助于我们解决这些问题的解决方案。但是一般的想法已经足够了;让我们开始部署和扩展 Java EE 应用程序。
先决条件
安装并运行 OpenShift Origin
并按照步骤
在 Docker 容器中构建 WildFly Swarm JAX-RS 微服务
。因为这是示例,所以我将进一步部署和扩展。
(注意:我同时使用了
OpenShift 项目的 all-in-on-vm
和
Fabric8 项目提供的 Vagrant 图像,
它们可以互换。它们的工作原理几乎相同,并且都依赖于 OpenShift Origin。如果您看到 URL 以.f8,例如代码或示例之一中的 https://vagrant.f8:8443,您可以使用 localhost 或其他可互换的主机映射。)
什么是 OpenShift 起源?
OpenShift Origin
是红帽分布式应用系统OpenShift的上游开源版本。我们启动这个项目是为了提供一个平台,开发团队可以在其中构建和管理基于 Docker 和 Kubernetes 的云原生应用程序。您可以
在 Github 上找到源代码
,我们知道您对改进 OpenShift Origin 有很好的想法。因此,卷起袖子
加入我们的社区吧
。
要掌握所有集成技术,需要了解很多知识。但是社区正在努力使我们这些企业 Java 开发人员尽可能容易理解和管理它。为了给你一个 OpenShift 的简要概述,这是一个简单的图表,说明一切是如何工作的:

如果您一直在关注有关 Docker 和 Kubernetes 的最新动态,您会在这里看到很多共同的部分。请求通过客户端进入并在路由层结束。它被分派到一个服务并命中一个在容器中运行我们的 Docker 镜像的 pod。 Pod 由复制控制器控制。当然,还有很多其他内容,但这应该是您现在需要了解的所有内容,以便对整个事情有一个初步的了解。
另一个更详细的概述让您对我们今天要处理的部件有更准确的了解。
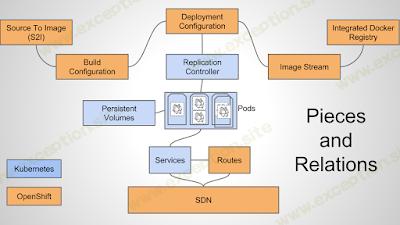
尤其是集成的 Docker 注册表、图像流、部署配置和路由到我们的服务目前很有趣。
基础 - 管理 UI 和客户端工具
在你设置你的 vagrant box 并启动它之后,你可以通过浏览到访问基于 Web 的管理:https://localhost:8443。多合一虚拟机未配置安全性。这意味着,使用了“Allow All”身份提供者。您可以使用任何非空的用户名和密码登录。 “admin”用户是拥有所有权限的管理用户。使用“admin/admin”登录后,您就可以完全使用 Origin。基于 Web 的管理非常适合查看日志文件和整体情况。它(尚未)功能齐全,不允许您调整或更改内容。首先,您需要使用命令行工具:“oc”。与网络管理类似,您还必须登录 OpenShift:
oc login https://localhost:8443
系统还会提示您输入用户名和密码 (admin/admin) 并显示项目列表:
Authentication required for https://vagrant.f8:8443 (openshift)
Username: admin
Password:
Login successful.
Using project "default".
You have access to the following projects and can switch between them with 'oc project <projectname>':
- default (current)
- openshift
- openshift-infra
现在您已准备好在 OpenShift 中进行一些管理。
公开内部 Docker 注册表
如果我们想在 OpenShift 中运行一个 dockerized 应用程序,它在 docker-hub 中不可用,我们需要将它推送到 OpenShift Docker Registry。默认情况下,它不会对外公开,因此首先要做的是通过路由公开 OpenShift Docker Registry 中的构建。
oc create -f registry-route.json
json 文件 包含路由的定义,并已签入我的 Github 存储库。确保根据需要调整 第 8 行中的主机名 。为了使这个示例起作用,我将以下映射添加到我在 Windows 上的主机文件中:
Authentication required for https://vagrant.f8:8443 (openshift)
Username: admin
Password:
Login successful.
Using project "default".
You have access to the following projects and can switch between them with 'oc project <projectname>':
- default (current)
- openshift
- openshift-infra
成功创建路由后,您所要做的就是相应地设置您的环境(当您关注我的介绍性博客文章时,您已经这样做了。所以这只是一个提醒):
Authentication required for https://vagrant.f8:8443 (openshift)
Username: admin
Password:
Login successful.
Using project "default".
You have access to the following projects and can switch between them with 'oc project <projectname>':
- default (current)
- openshift
- openshift-infra
创建项目和用户
让我们为示例创建一个新项目。由于命名空间的原因,我们将完全按照用户和图像名称命名项目:在本例中为“myfear”。
Authentication required for https://vagrant.f8:8443 (openshift)
Username: admin
Password:
Login successful.
Using project "default".
You have access to the following projects and can switch between them with 'oc project <projectname>':
- default (current)
- openshift
- openshift-infra

让我们通过简单地以以下身份登录来创建用户“myfear”:
Authentication required for https://vagrant.f8:8443 (openshift)
Username: admin
Password:
Login successful.
Using project "default".
You have access to the following projects and can switch between them with 'oc project <projectname>':
- default (current)
- openshift
- openshift-infra
调整示例
我们需要更改昨天示例中的 pom.xml 的某些部分。首先,我们需要告诉 Docker Maven 插件,它应该使用运行在 registry.vagrant.f8:80 的私有注册表。想知道,为什么这不是端口 5000?因为,我们通过 OpenShift 公开了该服务,而 HAProxy 通过端口 80 公开了该服务。取消注释
pom.xml 中的两行
:
Authentication required for https://vagrant.f8:8443 (openshift)
Username: admin
Password:
Login successful.
Using project "default".
You have access to the following projects and can switch between them with 'oc project <projectname>':
- default (current)
- openshift
- openshift-infra
并通过 oc 客户端工具获取用户 myfear 的登录令牌:
Authentication required for https://vagrant.f8:8443 (openshift)
Username: admin
Password:
Login successful.
Using project "default".
You have access to the following projects and can switch between them with 'oc project <projectname>':
- default (current)
- openshift
- openshift-infra
这将输出如下内容:
Authentication required for https://vagrant.f8:8443 (openshift)
Username: admin
Password:
Login successful.
Using project "default".
You have access to the following projects and can switch between them with 'oc project <projectname>':
- default (current)
- openshift
- openshift-infra
现在更新 pom 的 <authConfig> 元素 中的令牌。基本上就是这样。
构建并推送镜像
该图像已经在 我之前的博客文章 中构建,但让我们在这里再做一次:
Authentication required for https://vagrant.f8:8443 (openshift)
Username: admin
Password:
Login successful.
Using project "default".
You have access to the following projects and can switch between them with 'oc project <projectname>':
- default (current)
- openshift
- openshift-infra
现在将镜像推送到我们的 OpenShift Docker Registry:
Authentication required for https://vagrant.f8:8443 (openshift)
Username: admin
Password:
Login successful.
Using project "default".
You have access to the following projects and can switch between them with 'oc project <projectname>':
- default (current)
- openshift
- openshift-infra
其中会将镜像推送到registry.vagrant.f8:80/myfear/swarm-sample的过程输出。
在 OpenShift 上运行 Docker 镜像
现在我们只是使用常规方式在 OpenShift 上启动一个新的 Docker 镜像:
Authentication required for https://vagrant.f8:8443 (openshift)
Username: admin
Password:
Login successful.
Using project "default".
You have access to the following projects and can switch between them with 'oc project <projectname>':
- default (current)
- openshift
- openshift-infra
看看发生了什么:OpenShift 实际上在幕后创建了几个资源来处理部署和运行这个 Docker 镜像。首先,它创建了一个服务,它标识了一组它将代理和负载平衡的 pod。服务分配一个 IP 地址和端口对,在访问时重定向到适当的后端您关心服务的原因是它们基本上充当您的 pod 和任何需要使用在其中运行的 pod 的代理/负载平衡器OpenShift 环境。使用 describe 命令获取 OpenShift 从我们的镜像中创建的内容的完整描述:
Authentication required for https://vagrant.f8:8443 (openshift)
Username: admin
Password:
Login successful.
Using project "default".
You have access to the following projects and can switch between them with 'oc project <projectname>':
- default (current)
- openshift
- openshift-infra
哪些输出:
Authentication required for https://vagrant.f8:8443 (openshift)
Username: admin
Password:
Login successful.
Using project "default".
You have access to the following projects and can switch between them with 'oc project <projectname>':
- default (current)
- openshift
- openshift-infra
到目前为止,我们缺少的一件事是通过路由进行的外部映射。您还记得我们为 Docker Registry 做了什么吗?这是到目前为止的下一步也是最后一步。
Authentication required for https://vagrant.f8:8443 (openshift)
Username: admin
Password:
Login successful.
Using project "default".
You have access to the following projects and can switch between them with 'oc project <projectname>':
- default (current)
- openshift
- openshift-infra
正如您可能已经猜到的那样,我们还需要在主机文件中映射主机名:
Authentication required for https://vagrant.f8:8443 (openshift)
Username: admin
Password:
Login successful.
Using project "default".
You have access to the following projects and can switch between them with 'oc project <projectname>':
- default (current)
- openshift
- openshift-infra
我们完成了。为什么我没有使用 json 文件来创建路由?因为我想向您展示,它可以更简单,只要图像使用正确的端口 EXPOSE 定义,oc expose 命令就可以完成这项工作,而不必乱用 json。这是相同的结果。
浏览至:http://wildfly-swarm.vagrant.f8/rs/customer 并查看输出:
Authentication required for https://vagrant.f8:8443 (openshift)
Username: admin
Password:
Login successful.
Using project "default".
You have access to the following projects and can switch between them with 'oc project <projectname>':
- default (current)
- openshift
- openshift-infra
主机名是容器,我们的容器正在其上运行。
本系列的下一步是扩展和负载平衡我们的小示例。敬请期待更多!对更多 Java EE、Docker 和 OpenShift 有疑问或想法?请让我知道并在推特上关注我 @myfear
Authentication required for https://vagrant.f8:8443 (openshift)
Username: admin
Password:
Login successful.
Using project "default".
You have access to the following projects and can switch between them with 'oc project <projectname>':
- default (current)
- openshift
- openshift-infra